Getting Started
Follow the instructions to quickly get started with using easy_perception_deployment.
The steps are meant to be executed in sequence. Please follow the steps strictly.
Build Camera using ROS2
A ROS-supported camera device is required.
If you are using a laptop with an integrated camera, follow these steps to transform it a necessary ROS node.
We will continue to use the workspace we created in Setup
cd ~/epd_ros2_ws/src
git clone https://github.com/clydemcqueen/opencv_cam.git
git clone https://github.com/ptrmu/ros2_shared.git
cd ~/epd_ros2_ws
source /opt/ros/foxy/setup.bash
rosdep install --from-paths src --ignore-src -y --rosdistro "${ROS_DISTRO}"
colcon build
So you have a simple ROS2 camera package ready to go using your laptop camera.
Launch Camera ROS2
Run the following commands to verify if your camera setup is working.
# Open a new commandline terminal
cd ~/epd_ros2_ws/
source /opt/ros/foxy/setup.bash
source install/setup.bash
ros2 run opencv_cam opencv_cam_main
# Open a new commandline terminal
source /opt/ros/foxy/setup.bash
ros2 run image_tools showimage -r /image:=/image_raw
By running the commands in the 2 terminals, the Camera Setup is working if you see a window labelled, showimage displaying your camera feed.
Launch Easy Perception Deployment ROS2 Package
1. Double-click on easy_perception_deployment.desktop file on your Desktop. This file is generated by following the instructions under Setup.
A GUI window labelled, easy_perception_deployment, should appear.
2. Click on the button labelled, Deploy.
A GUI window labelled, Deploy, should appear.
3. Click on the button labelled, ONNX Model, and select FasterRCNN-10.onnx file under the following directory.
~/epd_ros2_ws/src/easy_perception_deployment/easy_perception_deployment/data/model/FasterRCNN-10.onnx
4. Click on the button labelled, Label List, and select coco_classes.txt file under the following directory.
~/epd_ros2_ws/src/easy_perception_deployment/easy_perception_deployment/data/label_list/coco_classes.txt
5. Click on the DropDown menu labelled, Use Case, and select Classification.
A window should appear, informing you that there are no further configurations required.
6. Change the image topic by changing the default image topic in the Deploy window:
/virtual_camera/image_raw
to:
/image_raw
as shown below:
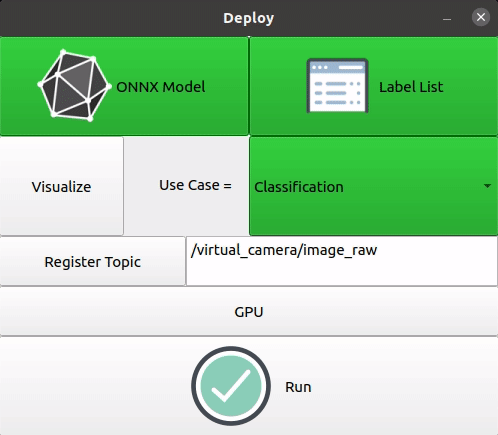
This sets the necessary link between any input ROS2 cameras and the easy_perception_deployment package.
7. Click on the button labelled, Run.
The easy_perception_deployment ROS2 package should start running and you should see your camera feed with bounding boxes showing the model inference result.